How to Upload Photos on Facebook Without Losing Quality
Are you uploading photos to Facebook and wondering why they look blurry or dull? This guide will help you.
As a wildlife, nature, and macro photographer working between Sweden and Sri Lanka, I’ve spent years capturing the intricate beauty of the natural world. Sharing these images on platforms like Facebook and Instagram has helped me connect with fellow photographers, clients, and nature lovers around the globe.
I previously wrote a blog article about this, but due to recent changes in Facebook and photo editing software, I decided to explain the latest methods I use to upload photographs to Facebook. This method is based on extensive research and numerous trial-and-error attempts, so it may vary from person to person.
For photographers, Facebook is an excellent platform for sharing photos, sample images, and works with audiences, clients, and friends. However, photographers often notice that their pictures lose sharpness and appear compressed and noisy after being uploaded to Facebook. The images on Facebook may appear softer and not as vibrant as in the original output. But there’s no need to worry. In this article, I’ll provide a comprehensive guide to help you fix blurry and unsharp images on Facebook and ensure they are displayed in high quality.
Why does Facebook degrade photo quality?
Facebook conserves server space by compressing the photos you upload, which can affect the overall quality of an image. I recommend uploading photographs with a width of 2048px to achieve the maximum quality. Avoid uploading photographs with dimensions larger than 2048px, as this allows Facebook to compress your photos using their compression method, resulting in visually poorer images with less sharpness.
Here are the recommended dimensions and specifications to maintain sharpness and quality:
Profile Picture:
Optimal size: 1080 x 1080 pixels
Minimum width and height: 600 pixels
Aspect ratio: Between 9:16 and 16:9, cropped to 1.91:1 with a link
Image format: JPG or PNG (PNG offers superior quality)
Note: Avoid using images with 20% or more text.
All Aspects (for general images):
Images should be 2048 pixels wide.
Square images: Use 2048 x 2048 pixels.
Portrait-oriented images: Opt for 2048 x 3072 pixels.
Landscape images: Go with 2048 x 1149 pixels.
Facebook Ads:
Display size: 1080px x 1080px recommended (or larger)
Minimum image ad width: 600px
Minimum image ad height: 600px
Aspect ratio: 1:1 or 1.91:1
File type: PNG or JPG
Maximum file size: 30MB
Upload HD Quality (Reason for Facebook Photos Blurry on iPhone or Android)
Firstly, it’s crucial to ensure your upload settings are correctly configured. Each device has an optional setting that can be adjusted to ensure all your media is captured in high-definition (HD) quality. If this setting isn’t enabled, it could explain why your Facebook pictures appear blurry. Here are the steps to adjust this setting:
For iOS devices:
Navigate to Settings and select Privacy.
In the Settings tab, find and select the Media and Contacts option.
Switch on the ‘Upload photos in HD’ option.
For Android devices:
Click on the button with the Hamburger icon, then navigate to Settings & Privacy.
In the Settings tab, proceed to the next screen.
Scroll down to locate Media and Contacts.
Finally, enable the ‘Upload Photos In HD’ option.
By ensuring your images are uploaded in HD, you can maintain the quality of your photos on Facebook. Remember, these settings may vary slightly depending on your device and its operating system.
Use sRGB Colour Profiles
Color management can pose a significant challenge for photographers. This is largely due to the fact that our cameras can record a wider range of colors than the standard sRGB color space used on the internet can display. Moreover, we often lack control over the calibration and quality of the screens on which our images are viewed. Typical screen issues often involve gamma levels, brightness, and inaccurate color profiles. Adding to the challenge, much of the software used for viewing photos and browsing the internet, such as Windows 10 Photos, does not effectively manage color. One helpful strategy is to drag your JPG into a Mozilla Firefox browser window to get a preview of how it will look on the internet. Firefox is beneficial in this context because it is a fully color-managed browser. When exporting your image from applications like Lightroom or Photoshop, it’s important to convert the color profile to the standard sRGB used on the internet. This step is crucial to accommodate two types of users: those with wide gamut displays and those using tablets or smartphones. Wide gamut displays need the image to be in sRGB to display correctly, otherwise, they will appear oversaturated. Conversely, smartphones generally do not recognize embedded ICC profiles. If we convert our images using Prophoto or Adobe1998 color spaces, they will appear undersaturated on these devices. By converting to sRGB when exporting, they will interpret the image correctly, even if they don’t recognize that the image is in sRGB.
PNG Conversion
In the past, Facebook used to upload PNG images as they are, given their lossless format which prevents compression. However, Facebook has since updated its process and now converts PNG images to JPG upon upload, followed by further compression. The previous advantage of PNG images, which was their superior quality compared to JPG, is no longer applicable due to this change. The rationale for exporting an image as a PNG before uploading it to Facebook was to limit the compression to a single stage, which would occur on Facebook. If you export an image as a JPG to your hard drive, it means you’ve already applied one level of compression when converting from RAW to JPG. When this JPG image is uploaded to Facebook, it undergoes another round of compression. When doing trial and error testing this theory, You can find that the difference to be negligible. Comparing a Facebook-converted PNG to JPG file with a Facebook-converted JPG to JPG file, both the size and visual quality appeared identical. While you can experiment with the PNG method, it offer no significant advantage. It’s also worth noting that PNG files are larger and will consume more storage space on your hard drive.
Don’t Double Your Compression
In the past, it was common practice to compress images to about 70% quality when exporting for web use. This was beneficial for website or blog posts as it reduced the file size, allowing for faster loading times and an overall better user experience. However, this practice doesn’t yield the same benefits when it comes to Facebook. Facebook applies its own compression to uploaded images, so if you upload an already compressed image, it will undergo further compression. This could potentially degrade the image quality. Advice about downsampling your image to 72DPI can be disregarded when it comes to Facebook. The platform will apply its own compression regardless of the DPI. Therefore, it’s best to leave your image at 300DPI and let Facebook’s algorithms handle the rest. This ensures that your image retains as much quality as possible before Facebook’s compression is applied.
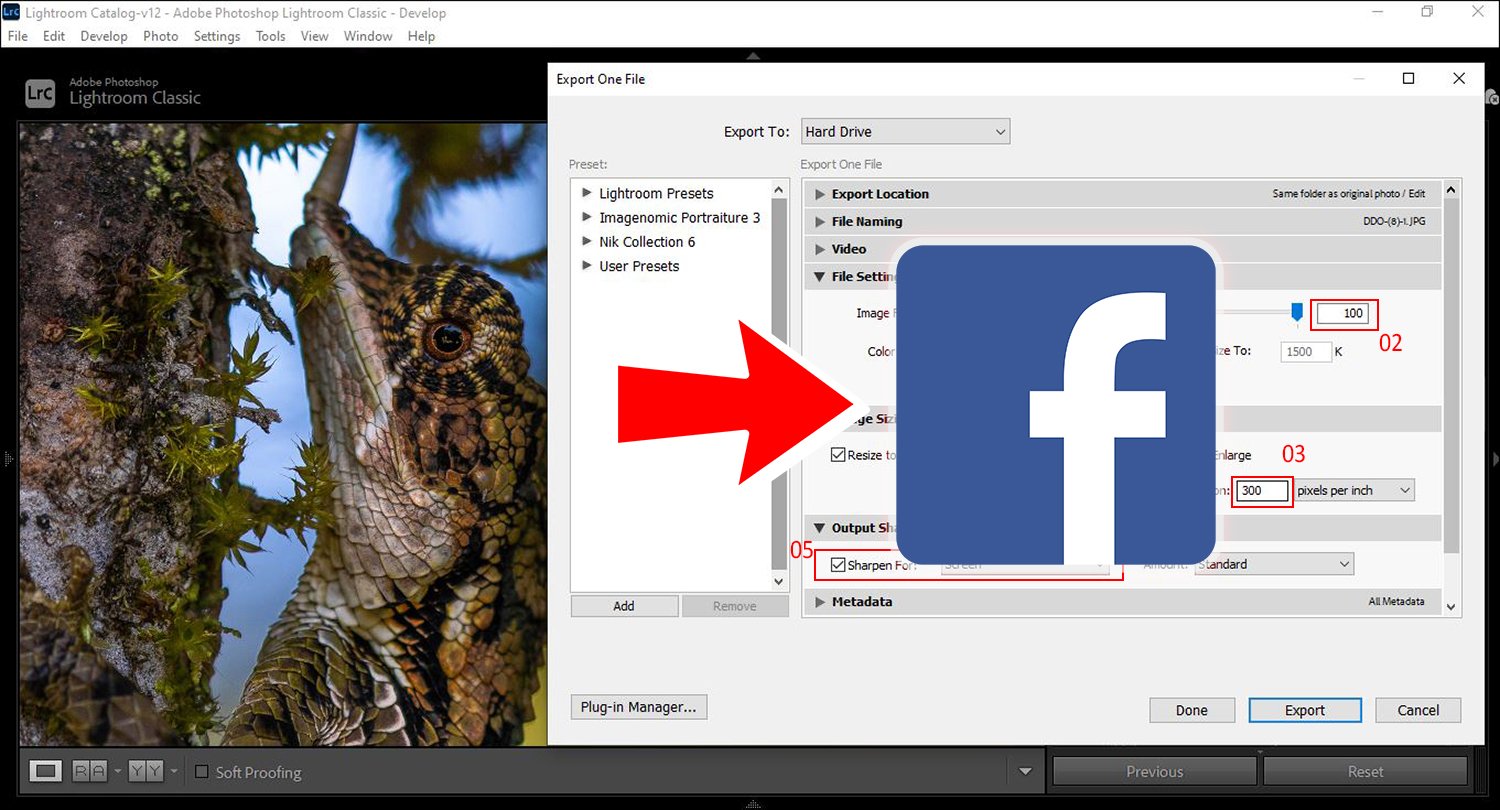
Using Adobe Lightroom to sharpen your photograph for screen and set the export settings, applicable for both Windows and Mac:
Go to File and select Export (Shortcut: Ctrl+Shift+E on Windows, Command+Shift+E on Mac)
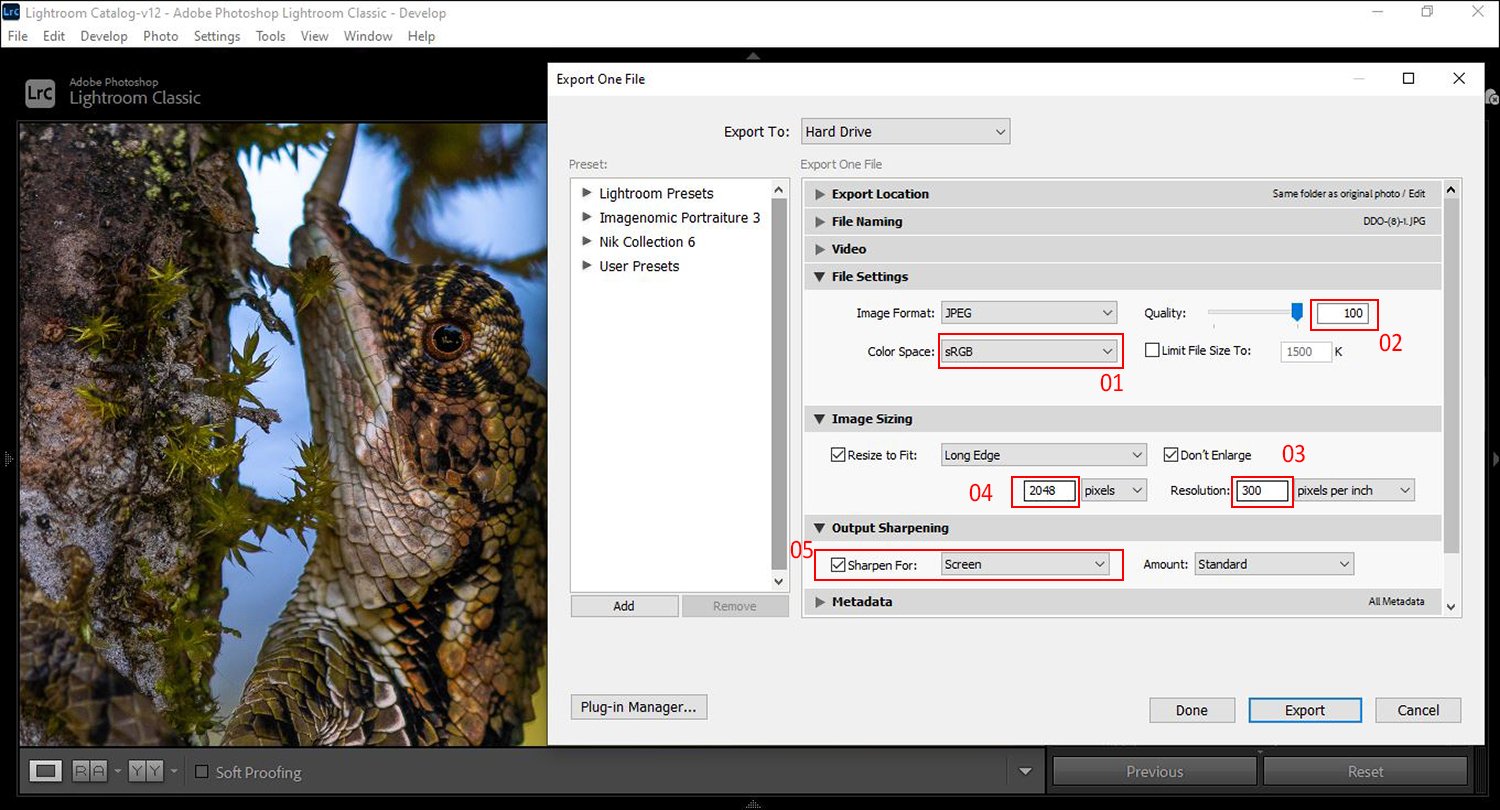
01) In the Export dialog box that appears, set the Color Space to sRGB.
02) Choose JPG as the Format and set the Quality to 100% to avoid reducing the quality.
03) Set the Resolution to 300DPI for full resolution export.
04) Under Image Sizing, set the Resize to Fit option to Long Edge and set the size to 2048 pixels.
05) Under Output Sharpening, select Sharpen For: Screen. Typically, I set the Amount as Standard.
06) Click Export and then observe the difference in your image.
These steps should help you maintain the quality of your images when exporting them for use on screens. Remember, these settings may vary slightly depending on your version of Adobe Lightroom and its features. Always ensure to keep your software updated for the best results.
Using Adobe Photoshop to sharpen your photograph for screen and set the export settings, applicable for both Windows and Mac:
If you’re editing in Adobe Lightroom and need to resize or sharpen in Adobe Photoshop, you can easily open photos from Lightroom to Photoshop using one of the following methods:
Method 01: Navigate to Photo —> Edit in —> Edit in Adobe Photoshop
or
Method 02: Right-click on the photo/s (or use Control+Click on Mac) and then select Edit in —> Edit in Adobe Photoshop
Next, you’ll need to resize the photograph:
Go to Image —> Image Size (Shortcut: Alt+Ctrl+I on Windows, Option+Command+I on Mac)

01) Set the longest edge to 2048px, resolution to 300DPI, check the “Resample” box and select “Bicubic Sharper (reduction)”.
Then, you’ll need to export the image using the “Save for Web” option:
Navigate to File —> Export —> Save For web (Shortcut: Alt+Shift+Ctrl+S on Windows, Option+Shift+Command+S on Mac)

02) Use a JPG Format at 100% quality (Avoid reducing the quality)
03) Set the Color Space to sRGB
04) The image size doesn’t need to be changed since we adjusted it in the previous step.
Finally, click Save.
These steps should help you maintain the quality of your images when exporting them for use on screens. Remember, these settings may vary slightly depending on your version of Adobe Photoshop and its features. Always ensure to keep your software updated for the best results.
For more blog articles related to wildlife, nature, photography, and traveling, you can visit my blog: Damith Danthanarayana's Blog.
Search the blog: